![]()

ENSO Calculations using Globus Compute
Overview
In this workflow, we combine topics covered in previous Pythia Foundations and CMIP6 Cookbook content to compute the Niño 3.4 Index to multiple datasets, with the primary computations occuring on a remote machine. As a refresher of what the ENSO 3.4 index is, please see the following text, which is also included in the ENSO Xarray content in the Pythia Foundations content.
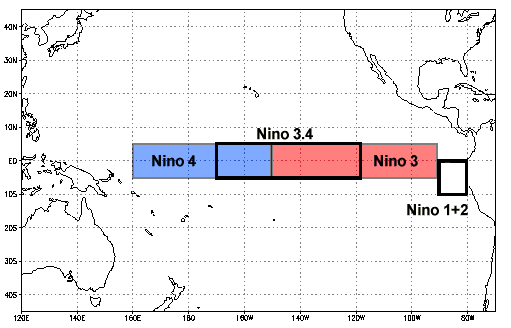
Niño 3.4 (5N-5S, 170W-120W): The Niño 3.4 anomalies may be thought of as representing the average equatorial SSTs across the Pacific from about the dateline to the South American coast. The Niño 3.4 index typically uses a 5-month running mean, and El Niño or La Niña events are defined when the Niño 3.4 SSTs exceed +/- 0.4C for a period of six months or more.
Niño X Index computation: a) Compute area averaged total SST from Niño X region; b) Compute monthly climatology (e.g., 1950-1979) for area averaged total SST from Niño X region, and subtract climatology from area averaged total SST time series to obtain anomalies; c) Smooth the anomalies with a 5-month running mean; d) Normalize the smoothed values by its standard deviation over the climatological period.
The previous cookbook, we ran this in a single notebook locally. In this example, we aim to execute the workflow on a remote machine, with only the visualizion of the dataset occuring locally.
The overall goal of this tutorial is to introduce the idea of functions as a service with Globus, and how this can be used to calculate ENSO indices.
Prerequisites
Concepts |
Importance |
Notes |
|---|---|---|
Necessary |
||
Necessary |
Interactive Visualization with hvPlot |
|
Helpful |
Familiarity with metadata structure |
|
Neccessary |
Understanding of Masking and Xarray Functions |
|
Dask |
Helpful |
Time to learn: 30 minutes
Imports
import hvplot.xarray
import holoviews as hv
import numpy as np
import hvplot.xarray
import matplotlib.pyplot as plt
import cartopy.crs as ccrs
from intake_esgf import ESGFCatalog
import xarray as xr
import cf_xarray
import warnings
import os
from globus_compute_sdk import Executor, Client
warnings.filterwarnings("ignore")

hv.extension("bokeh")


Accessing our Data and Computing the ENSO 3.4 Index
As mentioned in the introduction, we are utilizing functions from the previous ENSO notebooks. In order to run these with Globus Compute, we need to comply with the following requirements
All libraries/packages used in the function need to be installed on the globus compute endpoint
All functions/libraries/packages need to be imported and defined within the function to execute
The output from the function needs to serializable (ex. xarray.Dataset, numpy.array)
Using these constraints, we setup the following function, with the key parameter being which modeling center (model) to compare. Two examples here include The National Center for Atmospheric Research (NCAR) and the Model for Interdisciplinary Research on Climate (MIROC).
def run_plot_enso(model, return_path=False):
    import numpy as np
    import matplotlib.pyplot as plt
    from intake_esgf import ESGFCatalog
    import xarray as xr
    import cf_xarray
    import warnings
    warnings.filterwarnings("ignore")

    def search_esgf(institution_id, grid='gn'):

        # Search and load the ocean surface temperature (tos)
        cat = ESGFCatalog()
        cat.search(
            activity_id="CMIP",
            experiment_id="historical",
            institution_id=institution_id,
            variable_id=["tos"],
            member_id='r11i1p1f1',
            table_id="Omon",
        )
        try:
            tos_ds = cat.to_datatree()[grid].to_dataset()
        except ValueError:
            tos_ds = cat.to_dataset_dict()[""]

        # Search and load the ocean grid cell area
        cat = ESGFCatalog()
        cat.search(
            activity_id="CMIP",
            experiment_id="historical",
            institution_id=institution_id,
            variable_id=["areacello"],
            member_id='r11i1p1f1',
        )
        try:
            area_ds = cat.to_datatree()[grid].to_dataset()
        except ValueError:
            area_ds = cat.to_dataset_dict()[""]
        return xr.merge([tos_ds, area_ds])

    def calculate_enso(ds):

        # Subset the El Nino 3.4 index region
        dso = ds.where(
        (ds.cf["latitude"] < 5) & (ds.cf["latitude"] > -5) & (ds.cf["longitude"] > 190) & (ds.cf["longitude"] < 240), drop=True
        )

        # Calculate the monthly means
        gb = dso.tos.groupby('time.month')

        # Subtract the monthly averages, returning the anomalies
        tos_nino34_anom = gb - gb.mean(dim='time')

        # Determine the non-time dimensions and average using these
        non_time_dims = set(tos_nino34_anom.dims)
        non_time_dims.remove(ds.tos.cf["T"].name)
        weighted_average = tos_nino34_anom.weighted(ds["areacello"]).mean(dim=list(non_time_dims))

        # Calculate the rolling average
        rolling_average = weighted_average.rolling(time=5, center=True).mean()
        std_dev = weighted_average.std()
        return rolling_average / std_dev

    def add_enso_thresholds(da, threshold=0.4):

        # Conver the xr.DataArray into an xr.Dataset
        ds = da.to_dataset()

        # Cleanup the time and use the thresholds
        try:
            ds["time"]= ds.indexes["time"].to_datetimeindex()
        except:
            pass
        ds["tos_gt_04"] = ("time", ds.tos.where(ds.tos >= threshold, threshold).data)
        ds["tos_lt_04"] = ("time", ds.tos.where(ds.tos <= -threshold, -threshold).data)

        # Add fields for the thresholds
        ds["el_nino_threshold"] = ("time", np.zeros_like(ds.tos) + threshold)
        ds["la_nina_threshold"] = ("time", np.zeros_like(ds.tos) - threshold)

        return ds

    ds = search_esgf("NCAR")
    enso_index = add_enso_thresholds(calculate_enso(ds).compute())
    enso_index.attrs = ds.attrs
    enso_index.attrs["model"] = model

    return enso_index
Configure Globus Compute
Now that we have our functions, we can move toward using Globus Flows and Globus Compute.
Globus Flows is a reliable and secure platform for orchestrating and performing research data management and analysis tasks. A flow is often needed to manage data coming from instruments, e.g., image files can be moved from local storage attached to a microscope to a high-performance storage system where they may be accessed by all members of the research project.
More examples of creating and running flows can be found on our demo instance.
Setup a Globus Compute Endpoint
Globus Compute (GC) is a service that allows python functions to be sent to remote points, executed, with the output from that function returned to the user. While there are a collection of endpoints already installed, we highlight in this section the steps required to configure for yourself. This idea is also known as “serverless” computing, where users do not need to think about the underlying infrastructure executing the code, but rather submit functions to be run and returned.
To start a GC endpoint at your system you need to login, configure a conda environment, and pip install globus-compute-endpoint.
You can then run:
globus-compute-endpoint configure esgf-test
globus-compute-endpoint start esgf-test
Note that by default your endpoint will execute tasks on the login node (if you are using a High Performance Compute System). Additional configuration is needed for the endpoint to provision compute nodes. For example, here is the documentation on configuring globus compute endpoints on the Argonne Leadership Computing Facility’s Polaris system
https://globus-compute.readthedocs.io/en/latest/endpoints.html#polaris-alcf
endpoint_id = "b3d1d669-d49b-412e-af81-95f3368e525c"
Setup an Executor to Run our Functions
Once we have our compute endpoint ID, we need to pass this to our executor, which will be used to pass our functions from our local machine to the machine we would like to compute on.
gce = Executor(endpoint_id=endpoint_id)
gce.amqp_port = 443
gce
Executor<ep_id:b3d1d669-d49b-412e-af81-95f3368e525c; tg_id:None; bs:128>
Test our Functions
Now that we have our functions prepared, and an executor to run on, we can test them out using our endpoint!
We pass in our function name, and the additional arguments for our functions. For example, let’s look at comparing at the NCAR and MIROC modeling center’s CMIP6 simulations.
ncar_task = gce.submit(run_plot_enso, model='NCAR')
miroc_task = gce.submit(run_plot_enso, model='MIROC')
The results are started as python objects, with the resultant datasets available using .result()
ncar_ds = ncar_task.result()
miroc_ds = miroc_task.result()

ncar_ds
<xarray.Dataset>
Dimensions:            (time: 1980)
Coordinates:
  * time               (time) datetime64[ns] 1850-01-15T13:00:00.000008 ... 2...
    month              (time) int64 1 2 3 4 5 6 7 8 9 ... 4 5 6 7 8 9 10 11 12
Data variables:
    tos                (time) float32 nan nan 0.06341 ... 0.7921 nan nan
    tos_gt_04          (time) float32 0.4 0.4 0.4 0.4 ... 0.6829 0.7921 0.4 0.4
    tos_lt_04          (time) float32 -0.4 -0.4 -0.4 -0.4 ... -0.4 -0.4 -0.4
    el_nino_threshold  (time) float32 0.4 0.4 0.4 0.4 0.4 ... 0.4 0.4 0.4 0.4
    la_nina_threshold  (time) float32 -0.4 -0.4 -0.4 -0.4 ... -0.4 -0.4 -0.4
Attributes: (12/46)
    Conventions:            CF-1.7 CMIP-6.2
    activity_id:            CMIP
    branch_method:          standard
    branch_time_in_child:   674885.0
    branch_time_in_parent:  219000.0
    case_id:                972
    ...                     ...
    table_id:               Omon
    tracking_id:            hdl:21.14100/b0ffb89d-095d-4533-a159-a2e1241ff138
    variable_id:            tos
    variant_info:           CMIP6 20th century experiments (1850-2014) with C...
    variant_label:          r11i1p1f1
model: NCARPlot our Data
Now that we have pre-computed datasets, the last step is to visualize the output. In the other example, we stepped through how to utilize the .hvplot tool to create interactive displays of ENSO values. We will utilize that functionality here, wrapping into a function.
def plot_enso(ds):
    el_nino = ds.hvplot.area(x="time", y2='tos_gt_04', y='el_nino_threshold', color='red', hover=False)
    el_nino_label = hv.Text(ds.isel(time=40).time.values, 2, 'El Niño').opts(text_color='red',)

    # Create the La Niña area graphs
    la_nina = ds.hvplot.area(x="time", y2='tos_lt_04', y='la_nina_threshold', color='blue', hover=False)
    la_nina_label = hv.Text(ds.isel(time=-40).time.values, -2, 'La Niña').opts(text_color='blue')

    # Plot a timeseries of the ENSO 3.4 index
    enso = ds.tos.hvplot(x='time', line_width=0.5, color='k', xlabel='Year', ylabel='ENSO 3.4 Index')

    # Combine all the plots into a single plot
    return (el_nino_label * la_nina_label * el_nino * la_nina * enso).opts(title=f'{ds.attrs["model"]} {ds.attrs["source_id"]} \n Ensemble Member: {ds.attrs["variant_label"]}')
Once we have the function, we apply to our two datasets and combine into a single column.
(plot_enso(ncar_ds) + plot_enso(miroc_ds)).cols(1)
Summary
In this notebook, we applied the ENSO 3.4 index calculations to CMIP6 datasets remotely using Globus Compute and created interactive plots comparing where we see El Niño and La Niña.