Overview
Previously, you have learned how to detect precipitation and sea level pressure (SLP) features seperately. However, what if you wanted to plot the sea level pressure and precipitation features together, and plot them together in one plot? In this notebook, we will apply the previous algorithms to create plots analyzing SLP and preicpitation features using Scipy’s label function.
Prerequisites
| Concepts | Importance | Notes |
|---|---|---|
| xarray | Necessary | |
| matplotlib | Necessary | |
| Cartopy | Necessary | Needed to plot geospatial data |
| Scipy Precip Detection and Tracking Algorithm | Necessary | |
| Scipy SLP Detection and Tracking Algorithm | Necessary | |
| scipy-image | Useful | Useful reference for Scipy’s label function |
| IPython | Useful | For inline animation |
Import Packages
import xarray as xr
from scipy.ndimage import label, generate_binary_structure
import matplotlib.pyplot as plt
from scipy.ndimage import minimum_filter
import cartopy.crs as ccrs
import cartopy.feature as cfeature
import numpy as np
from matplotlib.animation import FuncAnimation
from IPython.display import HTML

import matplotlib.colors as mcolors
from matplotlib.cm import ScalarMappable
import pandas as pd
import math
Let’s create a function that handles events that cross over the international dateline.
def crosses_dateline(labeled_arr, resolution):
    #Shift 180 degrees
    shifted_arr = np.roll(labeled_arr, 180*resolution, axis = 1)

    #Examine a 3x3 region centered at the dateline
    for lat in range(0, len(shifted_arr) - 1):
    	sample_arr = shifted_arr[lat:lat+2, 179:181]

    	top_left = sample_arr[0, 0]
    	top_right = sample_arr[0, 1]
    	bottom_right = sample_arr[1, 1]
    	bottom_left = sample_arr[1, 0]

    	#Compare top left with position next to it
    	if(top_left != 0 and top_right != 0):
    		if(top_left != top_right):
    			num_to_change = top_left
    			shifted_arr = np.where(shifted_arr != num_to_change, shifted_arr, top_right)
    			sample_arr = shifted_arr[lat:lat+2, 179:181]

    	#Compare top left with position diagonal to it
    	if(top_left != 0 and bottom_right != 0):
    		if(top_left != bottom_right):
    			num_to_change = top_left
    			shifted_arr = np.where(shifted_arr != num_to_change, shifted_arr, bottom_right)
    			sample_arr = shifted_arr[lat:lat+2, 179:181]

    	#Compate bottom left with position next to it
    	if(bottom_left != 0 and bottom_right != 0):
    		if(bottom_left != bottom_right):
    			num_to_change = bottom_left
    			shifted_arr = np.where(shifted_arr != num_to_change, shifted_arr, bottom_right)
    			sample_arr = shifted_arr[lat:lat+2, 179:181]
    			#print('Changed arr bot left, bot right', sample_arr)

    	#Compare bottom left with position diagonal to it
    	if(bottom_left != 0 and top_right != 0):
    		if(bottom_left != top_right):
    			num_to_change = bottom_left
    			shifted_arr = np.where(shifted_arr != num_to_change, shifted_arr, top_right)
    			sample_arr = shifted_arr[lat:lat+2, 179:181]

    return np.roll(shifted_arr, 180, axis = 1)
Basic Set-Up
We have two previous algorithms that are useful to detect precipitation and SLP features. Let’s create a plot that plots both of these features together, which should hopefully reveal some characteritsics about extratropical cyclones (ETCs).
Before we do that though, we need to implement both the precipitation detection function and the SLP detection function.
Load in both datasets using xarray:
precip_data = xr.open_dataset('data/precip_ex.nc')
slp_data = xr.open_dataset('../notebooks/data/SLP_ex.nc')
The data contained within slp_data is in pascals, however atmospheric scientists commonly use hectopascals. We will therefore need to convert the array from pascals into hectopascals by dividing by 100.
slp = slp_data['SLP']/100Recall that although we have global data for slp_data, we only have northern hemisphere (specifically between 20°N and 80°N) data for precip_data. Therefore, we need to filter out the slp_data so that it only includes the same data points that are contained within the precip_data.
lat_vals = slp['latitude']
slp_nh_filtered = slp.where(lat_vals >= 20, drop=True)
slp_nh_filtered = slp_nh_filtered.where(lat_vals <= 80, drop=True)
Let’s create a 2-d grid for each of our datasets. Unfortunately, the two datasets do not have similar resolutions. The resolution of slp_data is 1° x 1°, while the resolution for precip_data is 0.25° x 0.25°. This therefore requires us to create two different grids for each of our datasets.
lon2d_slp, lat2d_slp = np.meshgrid(slp_nh_filtered['longitude'].values, slp_nh_filtered['latitude'].values)
lon2d_precip, lat2d_precip = np.meshgrid(precip_data['longitude'].values, precip_data['latitude'].values)
Scipy Precipitation and SLP Detection Algorithm
In order to identify slp minima, we need to set a threshold. We’ll say that any feature with a pressure below 1000hPa is a feature that we are interested in tracking for the SLP dataset.
Similarly, we’ll set up a threshold for minimum precipitation as well of 0.25 mm/hr.
slp_threshold = 1000
slp_1000 = np.where(slp_nh_filtered < slp_threshold, slp_nh_filtered, 0)

precip_threshold = 0.25
precip_25 = np.where(precip_data['ETC_tp'] > precip_threshold, precip_data['ETC_tp'], 0)
Let’s now run our algorithm to detect features that we have previously built in the Scipy SLP Detection and Tracking Algorithm notebook. We will first focus on a single time step.
s = generate_binary_structure(2,2)
def detect_feature(data, time_index, resolution):
    labeled_data_field, num_features = label(data[time_index], s)
    labeled_data_field = crosses_dateline(labeled_data_field, resolution)
    return labeled_data_field
Now that we have our function, let’s run this function on both preicp_data and slp_data for the first time index.
precip_features = detect_feature(precip_25, 0, 0.25)
slp_features = detect_feature(slp_1000, 0, 1)
Let’s go ahead and plot both the precip_features and slp_features.
plt.figure(figsize=(15,8))
ax = plt.axes(projection=ccrs.PlateCarree())
plt.contour(lon2d_slp, lat2d_slp, slp_features, cmap='tab20b')
## For precip features, let's convert anything associated with feature 0 (i.e. no rain) into np.nan so it doesn't show up as contoured.
precip_features_nan = np.where(precip_features == 0, np.nan, precip_features)
plt.contourf(lon2d_precip, lat2d_precip, precip_features_nan, cmap='tab20c')


ax.add_feature(cfeature.LAND)
ax.add_feature(cfeature.BORDERS, edgecolor='black')
ax.add_feature(cfeature.STATES, edgecolor='black')
ax.add_feature(cfeature.COASTLINE, edgecolor='black')

ax.set_title('Precip and SLP Features at Time Index 0 Overlaid')
ax.gridlines(draw_labels=True)
<cartopy.mpl.gridliner.Gridliner at 0x7f63145186e0>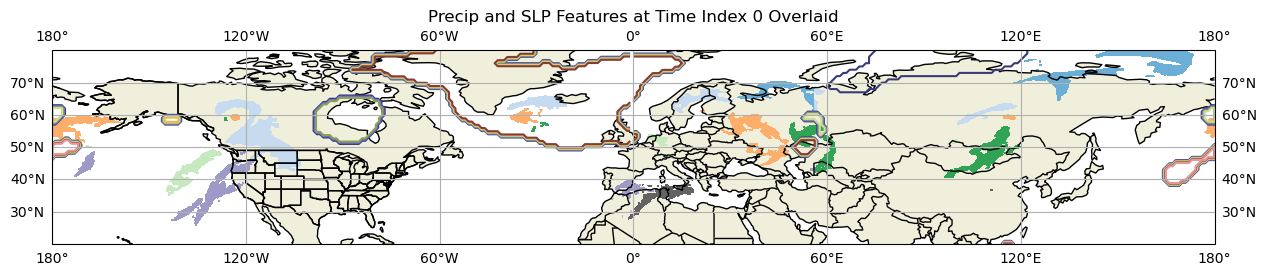
In this map, slp features are contoured and precipitation features are in filled contours. We can see in general that most slp features are associated with some precipitation features. However, in the northern latitudes such as near the Hudson Bay and off the coast of Alaska there are some exceptions. The reverse is not true. Not every precipitation feature is associated with a low slp feature, especially in regions closer to the equator. This indicates that most of the slp regions identified are associated with some sort of ETC, while the same is not true for precipitation regions.
Let’s create an animation showing the evolution of this.
## Let's create a function to write the figures necessary for the animation.


fig, ax = plt.subplots(subplot_kw={"projection": ccrs.PlateCarree()})

def func(i):
    ax.clear()

    precip_features = detect_feature(precip_25, i, 0.25)
    slp_features = detect_feature(slp_1000, i, 1)
    plt.contour(lon2d_slp, lat2d_slp, slp_features, cmap='tab20b')
    ## For precip features, let's convert anything associated with feature 0 (i.e. no rain) into np.nan so it doesn't show up as contoured.
    precip_features_nan = np.where(precip_features == 0, np.nan, precip_features)
    plt.contourf(lon2d_precip, lat2d_precip, precip_features_nan, cmap='tab20c')

    ax.add_feature(cfeature.LAND)
    ax.add_feature(cfeature.BORDERS, edgecolor='black')
    ax.add_feature(cfeature.STATES, edgecolor='black')

    ax.set_extent([-180, 180, 20, 80])

    ax.add_feature(cfeature.COASTLINE, edgecolor='black')

    ax.set_title('Precip and SLP Features Overlaid at Time Index ' + str(i), fontsize=8)

    provinces = cfeature.NaturalEarthFeature(
        category='cultural',
        name='admin_1_states_provinces_lines',
        scale='50m',
        facecolor='none',
        edgecolor='black'
    )
    ax.add_feature(provinces)
    ax.gridlines(draw_labels=True)
    plt.tight_layout()
    return fig,


anim = FuncAnimation(fig, func, frames=12, interval=300, blit=False)
HTML(anim.to_jshtml())
# anim.save('my_animation.gif', writer='pillow', fps=2)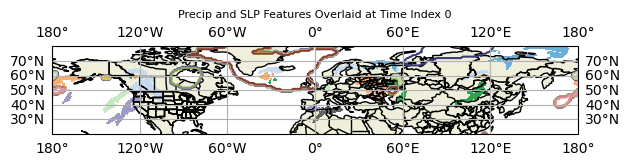
Getting Precipitation Rate and Minimum SLP for Each Feature
Like we did in previous notebooks, let’s take the functions that were previously defined for minimum slp and precipitation rate to make a plot.
minima = minimum_filter(slp_nh_filtered, 5, mode=['nearest', 'wrap'], axes = [1, 2])
minima_3 = (slp_nh_filtered == minima)
min_times, min_lats, min_lons = np.where(1 == minima_3)
Now let’s go ahead and make an animation of this time series!
## Let's create a function to write the figures necessary for the animation.


fig, ax = plt.subplots(subplot_kw={"projection": ccrs.PlateCarree()}, figsize=(15,8))

## Creating a colorbar across all frames.
vmin = 0
vmax = 2
levels = np.linspace(vmin, vmax, 10)
norm = mcolors.Normalize(vmin=vmin, vmax=vmax)
cmap='Greens'

sm = ScalarMappable(norm=norm, cmap=cmap)
sm.set_array([])
cbar = fig.colorbar(sm, ax=ax, pad=0.02, shrink=0.4)
cbar.set_label("Precipitation Rate [mm/hr]")

def func(i):
    ax.clear()

    where_time = np.where(min_times == i)
    timed_lats = min_lats[where_time]
    timed_lons = min_lons[where_time]

    precip_data_filtered = np.where(precip_data['ETC_tp'][i] > 0, precip_data['ETC_tp'][i], np.nan)

    ax.contourf(precip_data['longitude'], precip_data['latitude'], precip_data_filtered, vmin=0, vmax=2, cmap='Greens')

    ax.scatter(slp_nh_filtered[i].longitude[timed_lons], slp_nh_filtered[i].latitude[timed_lats])

    ax.add_feature(cfeature.LAND)
    ax.add_feature(cfeature.BORDERS, edgecolor='black')
    ax.add_feature(cfeature.STATES, edgecolor='black')

    ax.set_extent([-180, 180, 20, 80])

    ax.add_feature(cfeature.COASTLINE, edgecolor='black')

    ax.set_title('Precip and SLP Features Overlaid at Time Index ' + str(i))

    provinces = cfeature.NaturalEarthFeature(
        category='cultural',
        name='admin_1_states_provinces_lines',
        scale='50m',
        facecolor='none',
        edgecolor='black'
    )
    ax.add_feature(provinces)
    ax.gridlines(draw_labels=True)
    plt.tight_layout()
    return fig,


anim = FuncAnimation(fig, func, frames=12, interval=300, blit=False)
HTML(anim.to_jshtml())
# anim.save('my_animation.gif', writer='pillow', fps=2)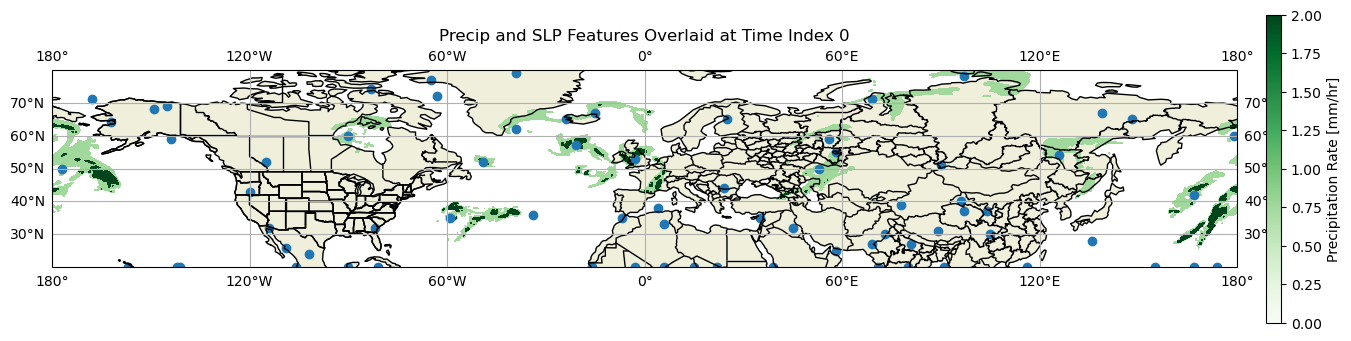
It’s important to note that in this diagram, any minima in sea level pressure is shown via the dots, not just those below 1000hPa. Therefore, there are a lot more dots on this map than features identified in the last image. Precipitation rate is in filled contours underneath the dots. These are filtered to only include areas where the precipitation rate is above 0mm/hr.
We can see a consistent pattern here. Anywhere there is precipitation, there is at least some local minima in SLP. We previously saw in the last example that the low pressure system doesn’t have to be below 1000hPa, but in every precipitation anomaly is at the very least associated with a local minima in SLP.
Let’s now add in the SLP features that we previously identified to this plot!
## Let's create a function to write the figures necessary for the animation.


fig, ax = plt.subplots(subplot_kw={"projection": ccrs.PlateCarree()}, figsize=(15,8))

## Creating a colorbar across all frames.
vmin = 0
vmax = 2
levels = np.linspace(vmin, vmax, 10)
norm = mcolors.Normalize(vmin=vmin, vmax=vmax)
cmap='Greens'

sm = ScalarMappable(norm=norm, cmap=cmap)
sm.set_array([])
cbar = fig.colorbar(sm, ax=ax, pad=0.02, shrink=0.4)
cbar.set_label("Precipitation Rate [mm/hr]")

def func(i):
    ax.clear()

    where_time = np.where(min_times == i)
    timed_lats = min_lats[where_time]
    timed_lons = min_lons[where_time]

    precip_data_filtered = np.where(precip_data['ETC_tp'][i] > 0, precip_data['ETC_tp'][i], np.nan)

    ax.contourf(precip_data['longitude'], precip_data['latitude'], precip_data_filtered, vmin=0, vmax=2, cmap='Greens')

    ax.contour(lon2d_slp, lat2d_slp, slp_features, colors='black')

    ax.scatter(slp_nh_filtered[i].longitude[timed_lons], slp_nh_filtered[i].latitude[timed_lats])

    ax.add_feature(cfeature.LAND)
    ax.add_feature(cfeature.BORDERS, edgecolor='black')
    ax.add_feature(cfeature.STATES, edgecolor='black')

    ax.set_extent([-180, 180, 20, 80])

    ax.add_feature(cfeature.COASTLINE, edgecolor='black')

    ax.set_title('Precip and SLP Features Overlaid at Time Index ' + str(i))

    provinces = cfeature.NaturalEarthFeature(
        category='cultural',
        name='admin_1_states_provinces_lines',
        scale='50m',
        facecolor='none',
        edgecolor='black'
    )
    ax.add_feature(provinces)
    ax.gridlines(draw_labels=True)
    plt.tight_layout()
    return fig,


anim = FuncAnimation(fig, func, frames=12, interval=300, blit=False)
HTML(anim.to_jshtml())
# anim.save('my_animation.gif', writer='pillow', fps=2)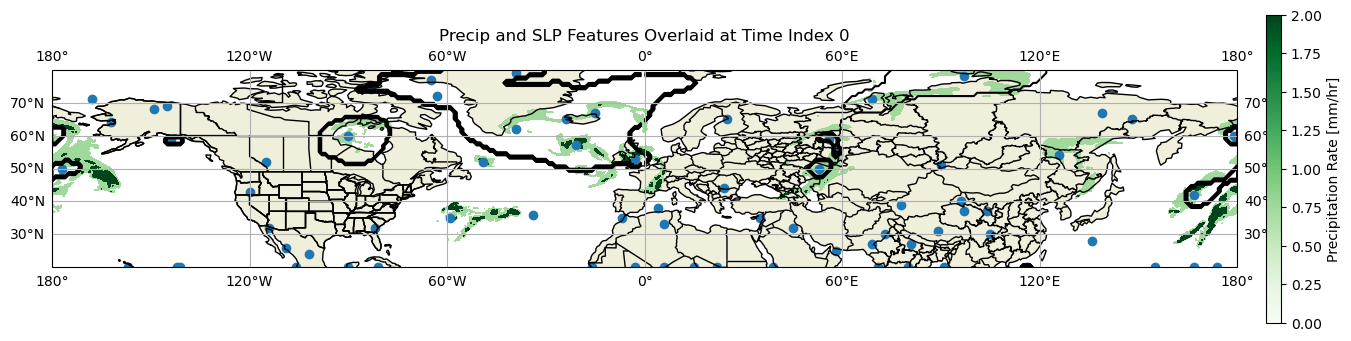
We can see now that although each contoured SLP system varies in size, each is typically associated with only one local minima in SLP, which means that our algorithm is working correctly! The one exception to this rule is over Greenland, where we can see multiple local minima within the very large contoured region. As this contoured region is very large, it is entirely possible that these are just mini low pressure systems within a much broader area of low SLP found within this region.
Additionally, we can see that every low pressure system is associated with at least some precipitation, consistent with our previous example. The opposite is not true however, as there are some precipitation contours that don’t have a corresponding SLP contour.
Creating a Tracking Algorithm
Now that we have explored a detection algorithm, we can apply it to a tracking algorithm, just like we did in previous notebooks. We’ll be re-using a lot of code from other notebooks, so please look back at the references if there is any confusion.
First, we will implement the precip_data tracking algorithm.
total_labeled_id_list = []
for i in range(len(precip_data['time'])):
    precip_feature_data = detect_feature(precip_25, i, 0.25)
    num_features = precip_feature_data.max()
    labeled_id_list = []
    for j in range(1, num_features+1):
        feature_precip_data = np.argwhere(precip_feature_data == j)
        latitudes = precip_data['latitude'][feature_precip_data[:, 0]]
        longitudes = precip_data['longitude'][feature_precip_data[:, 1]]
        longitudes = np.where(longitudes > 180, longitudes - 360, longitudes)

        ## Now we need to convert the latitudes/longitudes into cartesian coordinates.
        latitudes_rad = latitudes * np.pi/180
        longitudes_rad = longitudes * np.pi/180

        x = np.sum(np.cos(latitudes_rad) * np.cos(longitudes_rad))
        y = np.sum(np.cos(latitudes_rad) * np.sin(longitudes_rad))
        z = np.sum(np.sin(latitudes_rad))

        x /= len(latitudes_rad)
        y /= len(latitudes_rad)
        z /= len(latitudes_rad)

        central_lon = np.atan2(y,x) * 180/np.pi
        central_hypotenuse = np.sqrt(x*x + y*y)
        central_lat = np.atan2(z, central_hypotenuse) * 180/np.pi

        labeled_id_list.append((central_lon.data, central_lat.data, j))

    total_labeled_id_list.append(labeled_id_list)
def distance(lon1, lat1, lon2, lat2):
radius = 6371
dlat = math.radians(lat2 - lat1)
dlon = math.radians(lon2 - lon1)
a = math.sin(dlat/2) * math.sin(dlat/2) + math.cos(math.radians(lat1)) * math.cos(math.radians(lat2)) * math.sin(dlon/2) * math.sin(dlon/2)
c = 2 * math.atan2(math.sqrt(a), math.sqrt(1-a))
d = radius * c
return dfirst_time_step = total_labeled_id_list[0]
tracked_list = []
for point in first_time_step:
time_index = 0
lon = point[0]
lat = point[1]
ind = point[2]
still_exists = True
specific_track_list = [(lon, lat, ind)]
while(still_exists):
time_index += 1
## If the current time step is beyond the total number of time steps within the dataset, get out of here!
if (time_index > len(precip_data['time']) - 1):
break
## Else, get time step data
next_time_step = total_labeled_id_list[time_index]
distances = np.zeros((len(next_time_step)))
index = 0
for feature in next_time_step:
dist = distance(lon, lat, feature[0], feature[1])
distances[index] = dist
index += 1
min_dist = np.argmin(distances)
if (np.min(distances) < 200):
new_lat = next_time_step[min_dist][1]
new_lon = next_time_step[min_dist][0]
new_ind = next_time_step[min_dist][2]
specific_track_list.append((new_lon, new_lat, new_ind))
else:
still_exists = False
tracked_list.append(specific_track_list)Now that we have precipitation features tracked, let’s go ahead and track features to track the slp_data.
#Find the main SLP center for each object at each time step
deepest_mins_list = []

for time_step in np.arange(0, len(slp)):
    where_time = np.where(min_times == time_step)
    proper_time_lats = min_lats[where_time]
    proper_time_lons = min_lons[where_time]

    deepest_mins = {}

    slp_features = detect_feature(slp_1000, time_step, 1)
    for label_num in range(1, int(slp_features[time_step].max() + 1)):

        mask = (slp_features[proper_time_lats, proper_time_lons] == label_num)

        if(not np.any(mask)):
            continue

        obj_lat = proper_time_lats[mask]
        obj_lon = proper_time_lons[mask]

        obj_slp = slp_nh_filtered.values[time_step][obj_lat, obj_lon]

        lowest = np.argmin(obj_slp)

        deepest_mins[label_num] = (slp_nh_filtered['latitude'].values[obj_lat[lowest]], obj_lon[lowest], label_num)
    deepest_mins_list.append(deepest_mins.copy())
    deepest_mins.clear()
#We now have all minima at each time step. Now, it's time to stitch the tracks together
#Start with time step 1, check to see what's within 500 km. If none, then the track ends

first_time_step = deepest_mins_list[0]
tracked_list_slp = []
track_no = 1
for min_point in first_time_step:
    time_ind = 0

    #Start with minimum for first object
    min_point_lat = first_time_step[min_point][0]
    min_point_lon = first_time_step[min_point][1]
    min_point_ind = first_time_step[min_point][2]
    still_exists = True

    specific_track_list = [(min_point_lon, min_point_lat, min_point_ind)]
    while(still_exists):
        time_ind += 1

        if(time_ind > len(deepest_mins_list) - 1):
            break

        #Go to next time step
        next_time_step = deepest_mins_list[time_ind]

        distances = np.zeros((len(next_time_step.items())))

        ind = 0
        for feat in next_time_step.values():
            dist = distance(min_point_lon, min_point_lat, feat[1], feat[0])
            distances[ind] = dist

            ind += 1

        min_dist = np.argmin(distances)
        #print(min_dist, next_time_step)
        if(np.min(distances) < 500):
            new_min_point_lat = list(next_time_step.items())[min_dist][1][0]
            new_min_point_lon = list(next_time_step.items())[min_dist][1][1]
            new_min_point_ind = list(next_time_step.items())[min_dist][1][2]
            specific_track_list.append((new_min_point_lon, new_min_point_lat, new_min_point_ind))
        else:
            still_exists = False
    track_no += 1
    tracked_list_slp.append(specific_track_list)
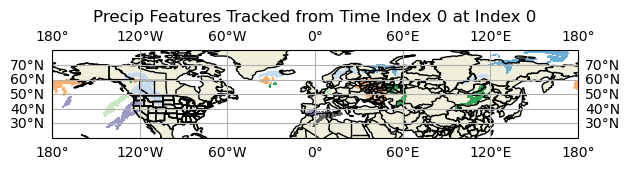
Now that we have tracked both precipitation and SLP features, let’s go ahead and plot them!
def get_id_tracks(tracked_list, data, time_ind, resolution):
    id_at_time = np.empty(0)
    for i in range(len(tracked_list)):
        specific_track = tracked_list[i]
        if (len(specific_track) <= time_ind):
            continue
        time_index = specific_track[time_ind]
        id_at_time = np.append(id_at_time, time_index[2])

    precip_data = detect_feature(data, time_ind, resolution)
    mask = ~np.isin(precip_data, id_at_time)
    precip_data[mask] = 0
    return precip_data
## Let's create a function to write the figures necessary for the animation.
fig, ax = plt.subplots(subplot_kw={"projection": ccrs.PlateCarree()})
def func(i):
ax.clear()
# lon2d, lat2d = np.meshgrid(no_minimal_precip['longitude'], no_minimal_precip['latitude'])
subset_labeled_data = get_id_tracks(tracked_list, slp_1000, i, 1).astype(float)
subset_labeled_data[subset_labeled_data == 0] = np.nan
ax.contour(lon2d_slp, lat2d_slp, subset_labeled_data, colors='black', transform=ccrs.PlateCarree())
subset_labeled_data = get_id_tracks(tracked_list, precip_25, i, 0.25).astype(float)
subset_labeled_data[subset_labeled_data == 0] = np.nan
plt.contourf(lon2d_precip, lat2d_precip, subset_labeled_data, cmap='tab20c', transform=ccrs.PlateCarree())
ax.add_feature(cfeature.LAND)
ax.add_feature(cfeature.BORDERS, edgecolor='black')
ax.add_feature(cfeature.STATES, edgecolor='black')
ax.set_extent([-180, 180, 20, 80])
ax.add_feature(cfeature.COASTLINE, edgecolor='black')
ax.set_title('Precip Features Tracked from Time Index 0 at Index ' + str(i))
provinces = cfeature.NaturalEarthFeature(
category='cultural',
name='admin_1_states_provinces_lines',
scale='50m',
facecolor='none',
edgecolor='black'
)
ax.add_feature(provinces)
ax.gridlines(draw_labels=True)
plt.tight_layout()
return fig,
anim = FuncAnimation(fig, func, frames=len(slp_nh_filtered['time']), interval=300, blit=False)
HTML(anim.to_jshtml())
# anim.save('my_animation.gif', writer='pillow', fps=2)